Git基于C语言开发
Git学习手册
集中式VS分布式
集中式版本控制系统
- 版本库集中存放于中央服务器,用时取,用完再推送到中央服务器
- 工作需联网/处于同一局域网内
分布式版本控制系统
- 每台电脑中都有完整的版本库,协作时只需要将文件推送给其它用户即可
Git的安装
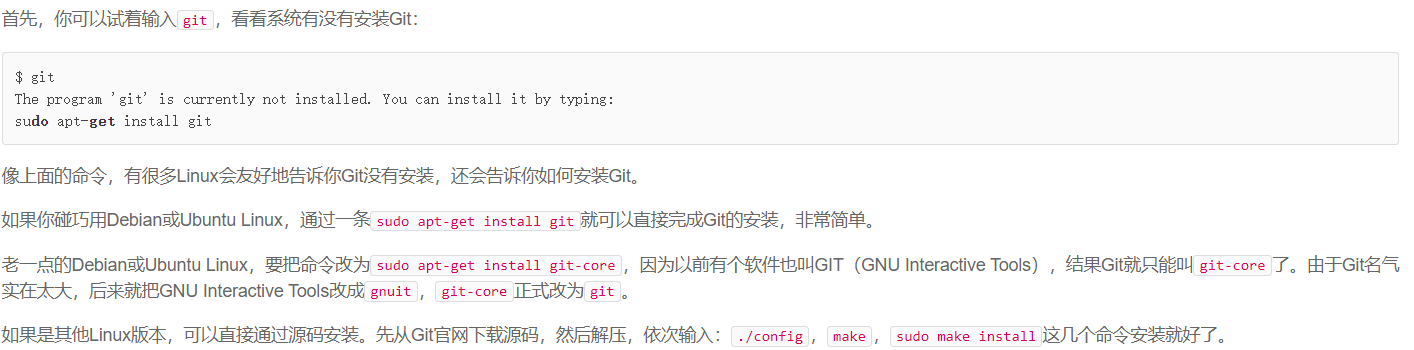
Linux系统
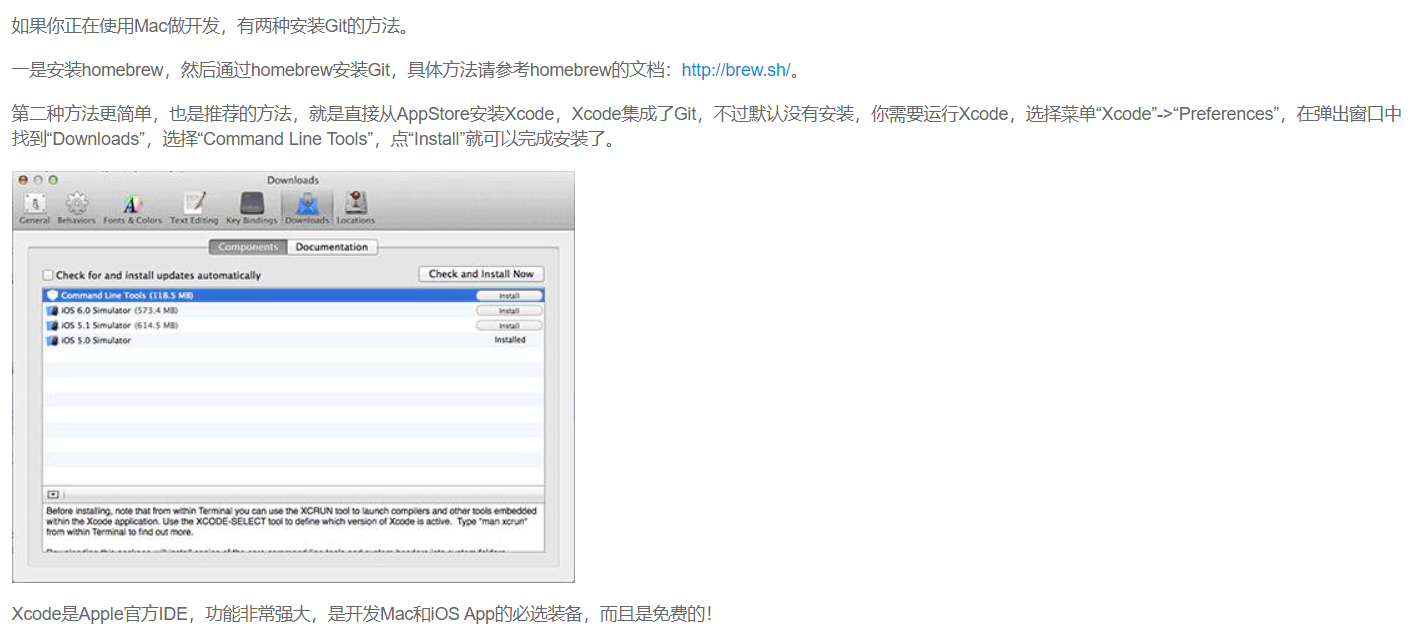
MacOS
Windows
- 从官网直接下载安装即可
设置参数
-
最后输入以下信息确定用户信息 git config –global user.name “Your Name” git config –global user. email “Email@example.com”
注意:git config命令的–global参数,用了这个参数,表示你这台机器上所有的Git仓库都会使用这个配置,当然也可以对某个仓库制定不同的用户名和Email地址
说明
对于老版本的Git及其他所有的版本控制系统只能跟踪文本文件的改动,比如TXT、网页、程序代码等。而图片、视频这些二进制文件虽然能由版本控制系统管理,但无法跟踪文件的变化,word格式是二进制格式,无法跟踪word文件变化。使用版本控制系统时,要以纯文本的方式编写文件
Git的使用
Git命令
-
git init 创建Git仓库
通过git init命令可以把当前目录变成Git可以管理的仓库
-
git add 添加文件到仓库
例如:执行git add readme.txt
-
git commit -m 把文件提交到仓库
例如:执行git commit -m “wrote a readme file”
(-m 后面输入的是本次提交的说明)
Git添加文件需要add,commit两步,commit一次可以提交很多文件,add可以多次添加不同的文件
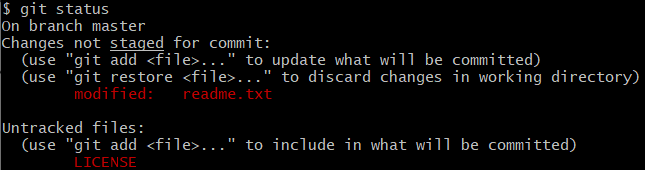
- git status 查看仓库当前的状态
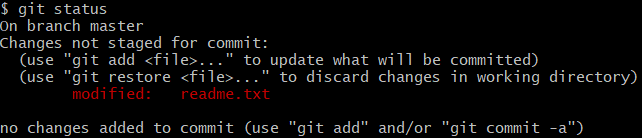
通过结果可知,readme.txt被修改
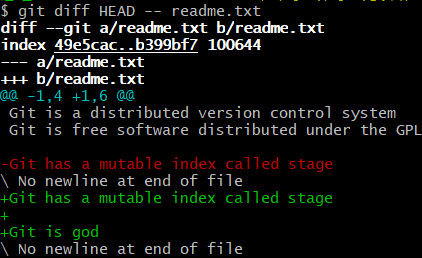
- git diff 查看仓库修改的内容
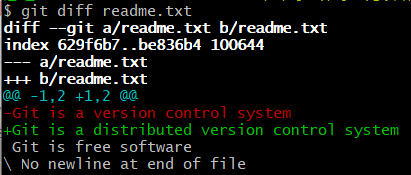
通过输出可以知道我们在第一行添加了一个distributed单词
使用git diff HEAD – readme.txt 查看工作区和版本库里面最新版本的区别
- git log 查看仓库修改的历史记录
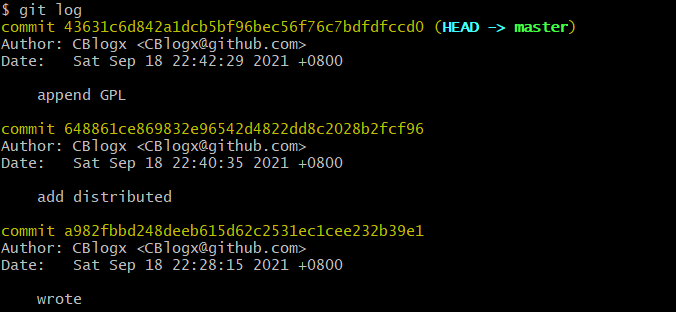
使用 “–pretty=oneline” 可以简略查看输出信息 (由commit id + message 组成)HEAD表示当前版本

-
git reset 版本回退与前进
HEAD^:上一个版本,HEAD^^:上上一个版本,HEAD^100:上100个版本

使用commit id恢复到最新版本,git会自动寻找对应版本

- git reset HEAD 撤销暂存区的修改
- git reflog 记录每一次命令

-
git checkout – file 撤销工作区的修改
-
file自修改后还没有被放到暂存区,撤销修改就回到和版本库一模一样的状态
-
file以及添加到暂存区后,又做了修改,撤销修改就回到添加到暂存区后的状态
-
git rm 从版本库中删除文件
-
git remote add origin https://github.com/xxx/xxx.git 本地仓库与远程仓库关联
-
git push -u origin master 将本地仓库所有内容推送到远程仓库
-
git remote rm 删除远程仓库
-
git clone 克隆远程仓库
-
git branch 查看分支
-
git branch 创建分支
-
git checkout / git switch 切换分支
-
git checkout -b / git switch -c 创建并切换分支
-
git checkout -b origin / 创建远程分支到本地
-
git merge 合并某分支到当前分支
-
git branch -d 删除分支
-
git remote 查看远程库的信息
1
2
3
4
5
6
$ git remote origin $ git remote -v #查看详细的信息 origin https://github.com/CBlogx/learnGit.git (fetch) origin https://github.com/CBlogx/learnGit.git (push) #如果没有推送权限就看不到push -
git push origin 推送分支
1
2
3
$git push origin master #推送到远程对应的master分支 $git push origin dev #推送到其它分支master分支是主分支,因此要时刻与远程同步
dev分支是开发分支,团队所有成员都需要在上面工作,所以也需要与远程同步
bug分支用于本地修复,不必同步
feature分支是否推到远程,取决于团队的开发
-
git pull 抓取当前分支对应远程分支的最新的提交
-
git branch –set-upstream-to=origin/ 本地分支与远程分支进行链接
-
git add -f 强制添加该文件到Git
远程仓库
关联远程仓库
-
创建SSH Key,用户主目录下得到的id_rsa 为私钥,id_rsa.pub为公钥
1ssh-keygen -t rsa -C "youremail@example.com" -
GitHub中的SSH Key添加公钥
-
创建新仓库
-
将新仓库与本地仓库进行关联,并给定一个名字,如:origin
1git remote add origin https://github.com/CBlogx/learnGit.git -
将本地仓库的所有内容推送到远程库中
1git push -u origin master由于远程库是空的,第一次推送master分支时,加上了-u参数,Git不但会把本地的master分支内容推送到远程新的master分支,还会把本地的master分支和远程的master分支关联起来,以后推送或者拉取时就可以简化命令如下:
1git push origin master
SSH警告
第一次使用Git的clone或者push命令连接GitHub时,会得到下列警告
|
|
这是因为Git使用SSH连接,而SSH连接在第一次验证GitHub服务器的Key时,需要你确认GitHub的Key的指纹信息是否真的来自GitHub的服务器,输入yes即可。Git会给出一个警告,告诉你已经把GitHub的Key添加到本机的一个信任列表里了:
|
|
删除远程库
-
删除远程库前使用
git remote -v查看远程库信息1 2 3$ git remote -v origin https://github.com/CBlogx/learnGit.git (fetch) origin https://github.com/CBlogx/learnGit.git (push) -
根据名字使用
git remote rm xxx删除,比如删除origin1git remote rm origin这里“删除”只是解除了本地和远程的绑定关系,并非物理上删除了远程仓库。
克隆远程库
使用 git clone <Repo url> 克隆远程仓库
|
|
|
|
Git支持多种协议,其中ssh协议最快,默认的git://使用ssh,也可以使用https等其它协议,但是https除了速 度慢以外,最大的麻烦就是每次推送都必须输入口令。
分支管理
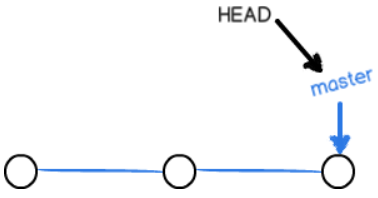
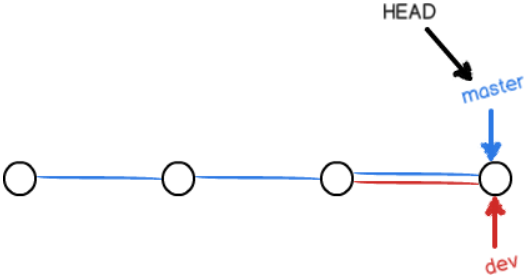
master分支是一条线,Git用master指向最新的提交,再用HEAD指向master,就能确定当前的分支,以及当前分支的提交点
创建与合并分支
-
创建dev分支并切换到dev分支
1 2$ git checkout -b dev Switched to a new branch 'dev'git checkout命令加上-b参数表示创建并切换,相当于一下两条命令1 2 3$git branch dev #创建分支 $git checkout dev #切换分支 Switched to branch 'dev'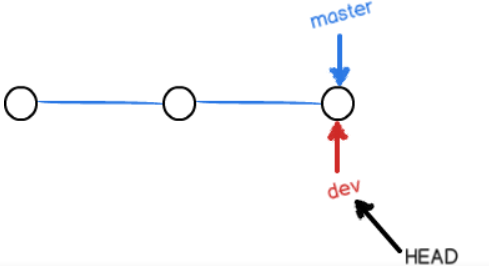
-
使用
git branch命令查看当前分支1 2 3$ git branch * dev #当前分支 master -
添加并提交到dev分支
1 2 3 4$ git add README.md $ git commit -m "branch test" [dev c6af4a6] branch test 1 file changed, 2 insertions(+), 1 deletion(-)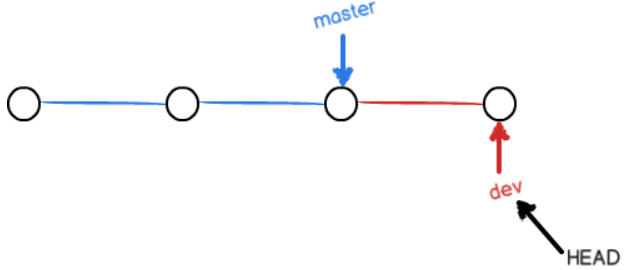
-
dev分支任务完成,切换回master无法看到修改后README.md
1
2
3
$ git checkout master Switched to branch 'master' Your branch is up to date with 'origin/master'. -
将dev分支的工作成果合并到master分支上
1 2 3 4 5$ git merge dev Updating 4868722..c6af4a6 Fast-forward README.md | 3 ++- 1 file changed, 2 insertions(+), 1 deletion(-)注意Fast-forward信息,Git告诉我们,这次合并是“快进模式”,也就是直接把master指向dev的当前提交,所以合并速度非常快
-
成功合并后,删除dev分支
1 2$ git branch -d dev Deleted branch dev (was c6af4a6). -
switch
由于
git checkout <branch>与git checkout -- <file>的命令过于相似,容易混淆。新版本的Git提供了git switch命令来切换分支-
创建并切换到新的dev分支:
1 2$ git switch -c dev Switched to a new branch 'dev' -
直接切换到已有的master分支:
1 2 3 4 5$ git switch master Switched to branch 'master' M README.md Your branch is ahead of 'origin/master' by 1 commit. (use "git push" to publish your local commits)
-
解决冲突
演示
-
新建分支feature1
-
修改readme.txt在feature1上进行提交
1 2 3 4 5$ git add readme.txt $ git commit -m "AND simple" [feature1 14096d0] AND simple 1 file changed, 1 insertion(+), 1 deletion(-) -
切换到master分支
1 2 3 4$ git switch master Switched to branch 'master' Your branch is ahead of 'origin/master' by 1 commit. (use "git push" to publish your local commits) -
修改readme.txt并提交
1 2 3 4 5$git add readme.txt $ git commit -m "& simple" [master ac546fb] & simple 1 file changed, 1 insertion(+) create mode 100644 readme.txt -
将master与feature1进行合并
1 2 3 4 5$ git merge featurel #此时出现了冲突 CONFLICT (add/add): Merge conflict in readme.txt Auto-merging readme.txt Automatic merge failed; fix conflicts and then commit the result. -
查看冲突原因
1 2 3 4 5 6 7 8 9 10 11 12 13 14$ git status On branch master Your branch is ahead of 'origin/master' by 2 commits. (use "git push" to publish your local commits) You have unmerged paths. (fix conflicts and run "git commit") (use "git merge --abort" to abort the merge) Unmerged paths: (use "git add <file>..." to mark resolution) both added: readme.txt no changes added to commit (use "git add" and/or "git commit -a") -
打开readme.txt
1 2 3 4 5<<<<<<< HEAD Creating a new branch is quick & simple ======= Creating a new branch is quick AND simple >>>>>>> featurelGit用
<<<<<<<、=======、>>>>>>>标记出不同分支的内容 -
手动修改后保存并再次提交
|
|
-
用带参数的git log 查看分支合并的情况
1 2 3 4 5 6 7 8 9 10 11 12 13 14$ git log --graph --pretty=oneline --abbrev-commit * 551be4a (HEAD -> master) conflict fixed |\ | * 9a4daf6 (featurel) AND simple * | ac546fb & simple |/ * c6af4a6 (dev) branch test * 4868722 (origin/master) testNewConnect * 4abaec1 remove readme * 362f09b understand how stage works * 43631c6 append GPL * 648861c add distributed * a982fbb wrote -
删除feature1分支
使用git log –graph 可以查看分支合并图
分支管理策略
merge的–no-ff方式
- 创建并切换dev分支
- 修改readme.txt并提交
- 切换回master分支
- 使用–no-ff合并分支,–no-ff表示禁用fast forward模式
|
|
- 使用git log 查看分支历史
|
|
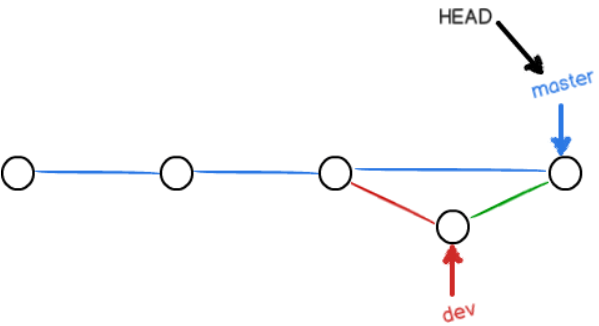
可以看到,不使用Fast forward模式,merge后就像下图。合并时使用–no-ff就可以用普通模式合并,合并后的历史有分支,能看出来曾经做过合并,而fast forward合并就看不出来曾经做过合并。
Bug分支
演示
假定此时正在dev分支工作,但bug出现在master需要在master分支上修复,此时dev现场如下:
1 2 3 4 5 6 7 8 9 10 11 12$ git status On branch dev Changes to be committed: (use "git reset HEAD <file>..." to unstage) new file: hello.py Changes not staged for commit: (use "git add <file>..." to update what will be committed) (use "git checkout -- <file>..." to discard changes in working directory) modified: readme.txt
-
保存dev工作现场
1 2$ git stash Saved working directory and index state WIP on dev: f52c633 add merge -
切换回master分支并从master创建临时分支
1 2 3 4 5 6 7$ git checkout master Switched to branch 'master' Your branch is ahead of 'origin/master' by 6 commits. (use "git push" to publish your local commits) $ git checkout -b issue-101 #创建issue-101临时分支 Switched to a new branch 'issue-101' -
bug出现在readme.txt,修复bug并提交,
1 2 3 4$ git add readme.txt $ git commit -m "fix bug 101" [issue-101 f940c69] “fix bug 101 1 file changed, 1 insertion(+) -
修复完成后,切换到master分支,并完成合并,最后删除issue-101分支
1 2 3 4 5 6 7 8 9$ git switch master Switched to branch 'master' Your branch is ahead of 'origin/master' by 6 commits. (use "git push" to publish your local commits) $ git merge --no-ff -m "merged bug fix 101" issue-101 Merge made by the 'recursive' strategy. readme.txt | 1 + 1 file changed, 1 insertion(+) -
回到dev分支,查看工作状态
1 2 3 4 5 6$ git switch dev Switched to branch 'dev' $ git status #???工作现场不见了 On branch dev nothing to commit, working tree clean -
使用
git stash list命令查看1 2$ git stash list stash@{0}: WIP on dev: f52c633 add merge #Git把stash内容存在stash@{0} -
恢复工作现场
-
使用
git stash apply恢复,但是stash内容不会自动删除,需要使用git stash drop删除 -
使用
git stash pop恢复的同时删除stash1 2 3 4 5 6 7 8 9 10 11 12 13 14$ git stash pop On branch dev Changes to be committed: (use "git reset HEAD <file>..." to unstage) new file: hello.py Changes not staged for commit: (use "git add <file>..." to update what will be committed) (use "git checkout -- <file>..." to discard changes in working directory) modified: readme.txt Dropped refs/stash@{0} (5d677e2ee266f39ea296182fb2354265b91b3b2a)可以多次stash,恢复的时候,使用
git stash list查看,然后恢复到指定的stash1$git stash apply stash@{0}
-
cherry-pick
因为dev是master的分支,因此dev上也存在相同的bug,我们需要把f940c69 fix bug 101 这个提交所作的修改“复制”到dev分支即可。为了方便操作,Git提供了一个cherry-pick命令
|
|
Git自动给dev分支做了一次提交,不过需要注意的是如果直接在dev分支上修复bug再在master分支上使用cherry-pick时,我们也需要使用git stash保存dev的工作现场之后才能切换分支
未合并的分支
我们创建一个新的feature分支,在该分支中提交了新的工作,然后回到dev分支,此时不想要feature中的内容,我们想要销毁该分支
1 2 3$ git branch -d feature error: The branch 'feature' is not fully merged. If you are sure you want to delete it, run 'git branch -D feature'.使用
git branch -d feature,无法销毁,那么我们就要使用git branch -D feature强行销毁
1 2$ git branch -D feature Deleted branch feature (was e72ce22).
多人协作模式
- 试图使用
git push origin <branch-name>推送自己的修改 - 如果推送失败,则因为远程分支比你的本地更新,需要先用
git pull进行合并 - 如果合并有冲突,则解决冲突,并在本地提交
- 没有冲突/解决冲突后,再用
git push origin <branch-name>推送 - 如果
git pull提示no tracking information则说明本地分支和远程分支链接关系没有创建,用命令git branch --set-upstream-to <branch-name> origin/<branch-name>进行链接
Rebase
多次合并再push后,使用 git log 查看分支合并情况时,情况如下
|
|
使用git rebase
|
|
使用Rebase的特点:把分叉的提交历史“整理”成一条直线,看上去更直观,但是缺点是本地的分叉提交已经被修改过
标签管理
Git的标签可以当作版本库的快照,但其实它就是指向某个commit的指针,创建和删除标签都是瞬间完成的
创建标签
- 使用
git tag <name> [commit id]创建新标签
|
|
-
给历史提交打上标签
1 2 3 4 5 6 7 8 9 10 11 12 13 14 15 16 17 18 19 20 21$ git log --pretty=oneline --abbrev-commit a7d7049 (HEAD -> master, tag: v1.0, origin/master) merged bug fix 101 f940c69 “fix bug 101 622131f merge with no-ff 56aa0b6 add merge 551be4a conflict fixed ac546fb & simple 9a4daf6 AND simple c6af4a6 branch test 4868722 testNewConnect 4abaec1 remove readme 362f09b understand how stage works 43631c6 append GPL 648861c add distributed a982fbb wrote $ git tag v0.9 f940c69 #给commit id为 f940c69 的提交打标签 $ git tag v0.9 v1.0 -
使用
git show <tagname>查看标签信息1 2 3 4 5 6 7 8 9 10 11 12 13 14 15 16$ git show v0.9 commit f940c69803cb84afcacff84cc3917df55ff03f28 (tag: v0.9) Author: CBlogx <CBlogx@github.com> Date: Sun Sep 19 15:24:10 2021 +0800 “fix bug 101 diff --git a/readme.txt b/readme.txt index 13dbc4b..ed1e735 100644 --- a/readme.txt +++ b/readme.txt @@ -2,3 +2,4 @@ Creating a new branch is quick and simple Git is god +Git is a free software -
创建带有说明的标签,用
-a指定标签名,-m指定说明文字1 2 3 4 5 6 7 8 9 10 11 12 13 14 15 16$ git tag -a v0.1 -m "version 0.1 released" 622131f $ git show v0.1 tag v0.1 #标签名 Tagger: CBlogx <CBlogx@github.com> Date: Sun Sep 19 17:01:18 2021 +0800 version 0.1 released #说明信息 commit 622131f76462118d3528317c70bf9c50f622e6a9 (tag: v0.1) Merge: 551be4a 56aa0b6 Author: CBlogx <CBlogx@github.com> Date: Sun Sep 19 15:06:12 2021 +0800 merge with no-ff
操作标签
-
删除标签
git tag -d <tagname>1 2 3$ git tag -d v0.1 Deleted tag 'v0.1' (was b20c2b5) #创建的标签都只存储再本地,不会自动推送到远程。所以,打错的标签可以再本地安全删除 -
推送标签
git push origin <tagname>1 2 3 4 5 6 7 8 9$ git push origin v1.0 #选择标签推送 Total 0 (delta 0), reused 0 (delta 0), pack-reused 0 To https://github.com/CBlogx/learnGit.git * [new tag] v1.0 -> v1.0 $ git push origin --tags #推送所有标签 Total 0 (delta 0), reused 0 (delta 0), pack-reused 0 To https://github.com/CBlogx/learnGit.git * [new tag] v0.9 -> v0.9 -
删除远程标签的三种方法
1 2 3 4 5 6 7 8 9 10 11 12 13 14 15$ git tag -d v0.9 #先删除本地标签 Deleted tag 'v0.9' (was f940c69) $ git push origin :refs/tags/v0.9 #删除远程标签(1) To https://github.com/CBlogx/learnGit.git - [deleted] v0.9 $ git push origin :v1.0 #删除远程标签(2) To https://github.com/CBlogx/learnGit.git - [deleted] v1.0 $ git push origin --delete tag v1.0 #删除远程标签(3) To https://github.com/CBlogx/learnGit.git - [deleted] v1.0
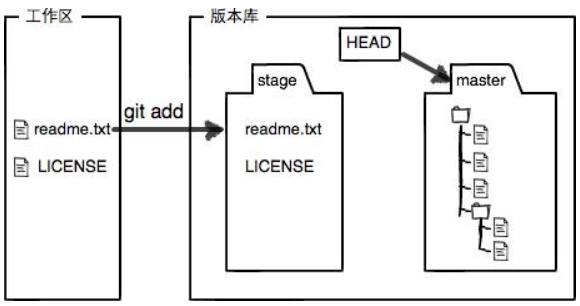
工作区与暂存区
- 工作区的隐藏目录 .git 为Git的版本库
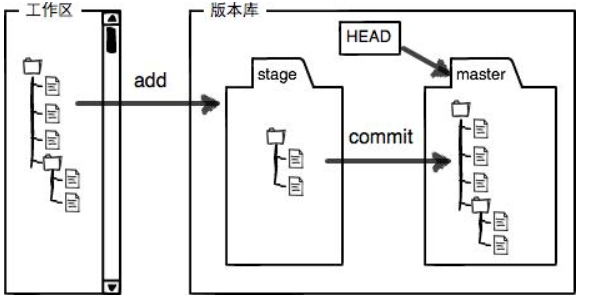
版本库中最重要的是称为stage的暂存区、Git自动创建的第一个分支master以及指向master的指针HEAD
-
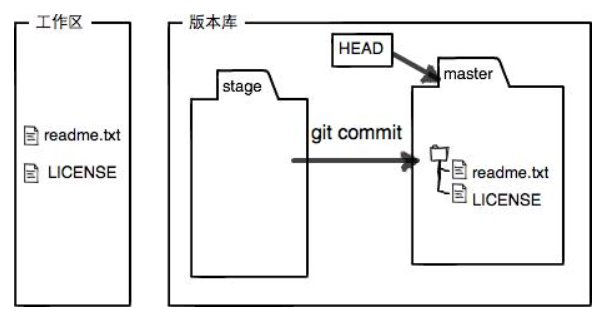
把文件添加进版本库,分两步执行
- git add 把文件修改添加到暂存区
- git commit 把暂存区的所有内容提交到当前分支
演示:
-
新增一个LICENSE文本文件
-
使用两次git add 添加readme.txt 和 LICENSE
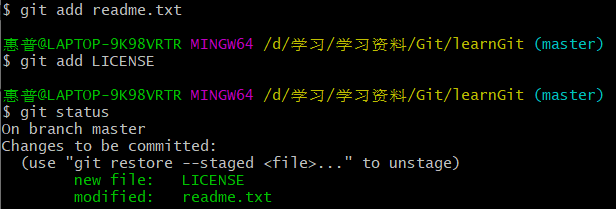
此时暂存区状态
-
使用git commit -m 提交后
自定义Git
忽略特殊文件
Git中配备了.gitignore 文件用来忽略特殊的文件
忽略原则:
- 忽略操作系统自动生成的文件,比如缩略图
- 忽略编译生成的中间文件、可执行文件,也就是如果一个文件是通过另一个文件自动生成的,那自动生成的文件就没必要放进版本库,比如java编译产生的.class文件
- 忽略你自己的带有敏感信息的配置文件,比如存放口令的配置文件
配置举例
|
|